Configuring Jasper
Generating a user profile
Jasper needs a configuration file that we call “profile”. In order for Jasper to accurately report local weather conditions, send you text messages, and more, you first need to generate a user profile.
To facilitate the process, run the profile population module that comes packaged with Jasper
cd ~/jasper/client
python populate.py
The process is fairly self-explanatory: fill in the requested information, or hit ‘Enter’ to defer at any step. By default, the resulting profile will be stored as a YML file at ~/.jasper/profile.yml.
Important: populate.py will request your Gmail password. Of course, this is purely optional and will never leave the device. This password allows Jasper to report on incoming emails and send you text or email notifications, but be aware that the password will be stored as plaintext in profile.yml. The Gmail address can be entered alone (without a password) and will be used to send you notifications if you configure a Mailgun account, as described below.
Choosing an STT engine
You need to choose which Speech-To-Text (STT) engine Jasper should use. An STT engine is basically a piece of software that takes recorded speech and transforms it into written text. If you say “foo”, but Jasper understands “bar”, it’s either a problem with your microphone or a bad or misconfigured STT engine. So choosing the right STT engine is crucial to use Jasper correctly. While most speech-recognition tools only rely on one single STT engine, Jasper tries to be modular and thus offers a wide variety of STT engines:
- Pocketsphinx is an open-source speech decoder by the CMU Sphinx project. It’s fast and designed to work well on embedded systems (like the Raspberry Pi). Unfortunately, the recognition rate is not the best and it has a lot of dependencies. On the other hand, recognition will be performed offline, i.e. you don’t need an active internet connection to use it. It’s the right thing to use if you’re cautious with your personal data.
- Google STT is the speech-to-text system by Google. If you have an Android smartphone, you might already be familiar with it, because it’s basically the same engine that performs recognition if you say OK, Google. It can only transcribe a limited amount of speech a day and needs an active internet connection.
- AT&T STT is a speech decoder by the telecommunications company AT&T. Like Google Speech, it also performs decoding online and thus needs an active internet connection.
- Wit.ai STT relies on the wit.ai cloud services and uses crowdsourcing to train speech recognition algorithms. Like you’d expect from a cloud service, you also need an active internet connection.
- Julius is a high-performance open source speech recognition engine. It does not need an active internet connection. Please note that you will need to train your own acoustic model, which is a very complex task that we do not provide support for. Regular users are most likely better suited with one of the other STT engines listed here.
Important: Except PocketSphinx and Julius, all of the above STT engines transfer the microphone data over the internet. If you don’t want Google, Wit.ai and AT&T to be able to listen to everything you say, do not use these STT engines! In this case, use PocketSphinx instead.
We also do not recommend using Internet-connected STT engines for passive listening. From privacy and performance standpoints, Pocketsphinx/Julius are superior solutions.
Configuring the Pocketsphinx STT engine
Install the required software. Then, locate your FST model (g014b2b.fst) and your Hidden Markov Model directory (hub4wsj_sc_8k). If the paths below are incorrect, add the correct paths to your profile.yml:
stt_engine: sphinx
pocketsphinx:
  fst_model: '../phonetisaurus/g014b2b.fst'                              #optional
  hmm_dir: '/usr/share/pocketsphinx/model/hmm/en_US/hub4wsj_sc_8k' #optional
Configuring the Julius STT engine
You also need an acoustic model in HTK format. Although VoxForge offers speaker-independent models, you will have to adapt the model and train it with you voice to get good recognition results. Please note that we do not offer support for this step. If you need help, ask in the respective forums. This stt engine also needs a lexicon file that maps words to phonemes and has to contain all words that Julius shall be able to recognize. A very comprehensive lexicon is the VoxForge Lexicon.
After creating your own acoustic model, you have to specify the paths to your hmmdefs, tiedlist and lexicon file in your profile.yml:
stt_engine: julius
julius:
  hmmdefs:  '/path/to/your/hmmdefs'
  tiedlist: '/path/to/your/tiedlist'
  lexicon:  '/path/to/your/lexicon.tgz'
  lexicon_archive_member: 'VoxForge/VoxForgeDict' # only needed if lexicon is a tar/tar.gz archive
If you encounter errors or warnings like voca_load_htkdict: line 19: triphone "r-d+v" not found, you are trying to recognize words that contain phones are not in your acoustic model. To be able to recognize these words, you need to train them in your acoustic model.
Configuring the Google STT engine
You need an Google Speech API key to use this. To obtain an API key, join the Chromium Dev group and create a project through the Google Developers console.
Then select your project. In the sidebar, navigate to “APIs & Auth.” and activate the Speech API. Under “APIs & Auth,” navigate to “Credentials.” Create a new key for public API access.
Add your credentials to your profile.yml:
stt_engine: google
keys:
    GOOGLE_SPEECH: 'your_google_speech_api_key_here_xyz1234'
Configuring the AT&T STT engine
The AT&T STT engine requires an AT&T app_key/app_secret to be present in
profile.yml. Please sign up at http://developer.att.com/apis/speech and
create a new app. You can then take the app_key/app_secret and put it into
your profile.yml:
stt_engine: att
att-stt:
  app_key:    4xxzd6abcdefghijklmnopqrstuvwxyz
  app_secret: 6o5jgiabcdefghijklmnopqrstuvwxyz
Configuring the Wit.ai STT engine
This implementation requires an Wit.ai Access Token to be present in profile.yml. Please sign up at https://wit.ai and copy your instance token, which can be found under Settings in the Wit console to your profile.yml:
stt_engine: witai
witai-stt:
  access_token:    ERJKGE86SOMERANDOMTOKEN23471AB
Choosing a TTS engine
A TTS engine does the exact opposite of an STT engine: It takes written text and transforms it into speech. Jasper supports many different TTS engines that differ by voice, intonation, “roboticness” and so on.
- eSpeak is a compact open-source speech synthesizer for many platforms. Speech synthesis is done offline, but most voices can sound very “robotic”.
- Festival uses the Festival Speech Synthesis System, an open source speech synthesizer developed by the Centre for Speech Technology Research at the University of Edinburgh. Like eSpeak, also synthesizes speech offline.
- Flite uses CMU Flite (festival-lite), a lightweight and fast synthesis engine that was primarily designed for small embedded machines. It synthesizes speech offline, so no internet connection is required.
- SVOX Pico TTS was the Text-to-Speech engine used in Android 1.6 “Donut”. It’s an open-source small footprint application and also works offline. The quality is rather good compared to eSpeak and Festival.
- Google TTS uses the same Text-to-Speech API which is also used by newer Android devices. The Synthesis itself is done on Google’s servers, so that you need an active internet connection and also can’t expect a lot of privacy if you use this.
- Ivona TTS uses Amazon’s Ivona Speech Cloud service, which is used in the Kindle Fire. Speech synthesis is done online, so an active internet connection and Amazon has access to everything Jasper says to you.
- MaryTTS is an open-source TTS system written in Java. You need to set up your own MaryTTS server and configure Jasper to use it. Because the server can be hosted on the same machine that runs Jasper, you do not need internet access.
- Mac OS X TTS does only work if you’re running Jasper on a Mac. It then uses the
saycommand in MacOS to synthesize speech.
Important: If you’re using Google STT (or Mary TTS with someone else’s server), everything Jasper says will be sent over the internet. If you don’t want Google or someone else to be able to listen to everything Jasper says to you, do not use these TTS engines!
Configuring the eSpeak TTS engine
Install eSpeak and choose espeak-tts as your TTS engine in your profile.yml:
tts_engine: espeak-ttsFurther customization is also possible by tuning the voice, pitch_adjustment and words_per_minute options in your profile.yml:
espeak-tts:
  voice: 'default+m3'   # optional
  pitch_adjustment: 40  # optional
  words_per_minute: 160 # optional
Configuring the Festival TTS engine
You need to install festival (and festival’s voices). If you’ve done that, you can set festival-tts as you TTS engine in your profile.yml:
tts_engine: festival-ttsIf you change the default voice of festival, Jasper will use this voice as well.
Configuring the Flite TTS engine
Install Flite and add it to your profile.yml:
tts_engine: flite-ttsIf you want to use another voice (e.g. ‘slt’), specify it in your profile.yml:
flite-tts:
  voice: 'slt'
To get a list of available voices, run flite -lv on the command line.
Configuring the SVOX Pico TTS engine
Install Pico Then, you just add it to your profile.yml:
tts_engine: pico-ttsConfiguring the Google TTS engine
Install the required dependencies for Google TTS. Then set google-tts as you TTS engine in your profile.yml:
tts_engine: google-ttsConfiguring the Ivona TTS engine
Install the required dependencies for accessing Amazon’s Ivona Speech Cloud service. You’ll also need to sign up for free to use their service. Then set ivona-tts as your TTS engine in your profile.yml and also paste your Ivona Speech Cloud keys:
tts_engine: ivona-tts
ivona-tts:
  # Keys can be obtained via:
  # https://www.ivona.com/us/account/speechcloud/creation/
  access_key: 'access_key' # required
  secret_key: 'secret_key' # required
  voice: 'Eric'            # optional, default is 'Brian'
  region: 'eu-west'        # optional, default is 'us-east'
  speech_rate: 'medium'    # optional
  sentence_break: 400      # optional
Configuring the Mary TTS engine
Simply set mary-tts as you TTS engine in your profile.yml. If you want, you can also change the default server to your own MaryTTS server:
tts_engine: mary-tts
mary-tts:
  server: 'mary.dfki.de'
  port: '59125'
  language: 'en_GB'
  voice: 'dfki-spike'
Note: Currently, the demo server at mary.dfki.de:59129 is not working, so you need to set up your own MaryTTS server (which you can download here).
Configuring the Mac OS X engine
Make sure that you’re about to run Jasper on a Mac. Look at the casing of your computer, there should a bitten apple symbol on it. Then set osx-tts as you TTS engine in your profile.yml:
tts_engine: osx-ttsOther things to configure
Mailgun as a Gmail alternative
If you’d prefer not to enter your Gmail password, you can setup a free Mailgun account that Jasper will use to send you notifications. It’s incredibly painless and Jasper is already setup for instant Mailgun integration. Note that if you don’t enter your Gmail address, however, Jasper will only be able to send you notifications by text message (as he won’t know your email address).
In slightly more detail:
- Register for a free Mailgun account.
- Navigate to the “Domains” tab and click on the sandbox server that should be provided initially.
- Click “Default Password” and choose a password.
- Take note of the “Default SMTP Login” email address.
-
Edit your profile.yml to read:
... mailgun: username: postmaster@sandbox95948.mailgun.org password: your_password - Enjoy your notifications.
Non-US weather data
If you want to use the Weather module, but you don’t live in the US, find out the WMO ID of you local weather station (last column of the table). The WMO ID is a unique number to identify weather stations and is issued by the World Meteorological Organization (WMO).
Then, add the WMO ID to your profile:
wmo_id: 10410 #if you live in Essen (Germany) or surrounding areaIf both location and wmo_id are in your profile.yml, the wmo_id takes precedence.
Facebook tokens
To enable Facebook integration, Jasper requires an API key. Unfortunately, this is a multi-step process that requires manual editing of profile.yml. Fortunately, it’s not particularly difficult.
- Go to https://developers.facebook.com and select ‘Apps’, then ‘Create a new app’.
- Give your app a name, category, etc. The choices here are arbitrary.
- Go to the Facebook Graph API Explorer and select your App from the drop down list in the top right (the default choice is ‘Graph API Explorer’).
- Click ‘Get Access Token’ and in the popup click ‘Extended Permissions’ and make sure ‘manage_notifications’ is checked. Now click ‘Get Access Token’ to get your token.
- (Optional) You’ll probably want to extend your token’s expiration date. Make a call to the following endpoint to receive a longer-lasting token: https://graph.facebook.com/oauth/access_token?client_id=YOUR_APP_ID&client_secret=YOUR_APP_SECRET&grant_type=fb_exchange_token&fb_exchange_token=YOUR_CURRENT_ACCESS_TOKEN
-
Take the resulting API key and add it to profile.yml in the following format:
 ...
 prefers_email: false
 timezone: US/Eastern
 keys:
     FB_TOKEN: abcdefghijklmnopqrstuvwxyz
Note that similar keys could be added when developing other modules. For example, a Twitter key might be required to create a Twitter module. The goal of the profile is to be straightforward and extensible.
Spotify integration
Jasper has the ability to play playlists from your Spotify library. This feature is optional and requires a Spotify Premium account. To configure Spotify on Jasper, just perform the following steps.
Install Mopidy with:
wget -q -O - http://apt.mopidy.com/mopidy.gpg | sudo apt-key add -
sudo wget -q -O /etc/apt/sources.list.d/mopidy.list http://apt.mopidy.com/mopidy.list
sudo apt-get update
sudo apt-get install mopidy mopidy-spotify --yes
We need to enable IPv6:
sudo modprobe ipv6
echo ipv6 | sudo tee -a /etc/modules
Now run sudo vim /root/.asoundrc, and insert the following contents:
pcm.!default {
        type hw
        card 1
}
ctl.!default {
        type hw
        card 1
}
We need to create the following new file and delete the default startup script:
sudo mkdir /root/.config
sudo mkdir /root/.config/mopidy
sudo rm /etc/init.d/mopidy
Now let’s run sudo vim /root/.config/mopidy/mopidy.conf and insert the following
[spotify]
username = YOUR_SPOTIFY_USERNAME
password = YOUR_SPOTIFY_PASSWORD

[mpd]
hostname = ::

[local]
media_dir = ~/music

[scrobbler]
enabled = false

[audio]
output = alsasink
Finally, let’s configure crontab to run Mopidy by running sudo crontab -e and inserting the following entry:
@reboot mopidy;Upon restarting your Jasper, you should be able to issue a “Spotify” command that will enter Spotify mode. For more information on how to use Spotify with your voice, check out the Usage guide.
Software Architecture
Having installed and configured Jasper and its required libraries, it is worth taking a moment to understand how they interact and how the code is architected.
The program is organized into a number of different components:
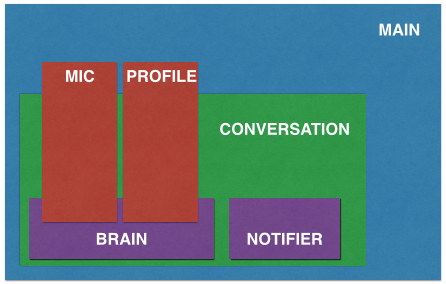
jasper.py is the program that orchestrates all of Jasper. It creates mic, profile, and conversation instances. Next, the conversation instance is fed the mic and profile as inputs, from which it creates a notifier and a brain.
The brain then receives the mic and profile originally descended from main and loads all the interactive components into memory. The brain is essentially the interface between developer-written modules and the core framework. Each module must implement isValid() and handle() functions, as well as define a WORDS = [...] list.
To learn more about how Jasper interactive modules work and how to write your own, check out the API guide
Next Steps
Now that you have fully configured your Jasper software, you’re ready to start using it. Check out the Usage page for next steps.